![]()
![]()
![]()
![]()
![]()
![]()
![]()

|
|
|
Telescoping
Metal Pole
This pole can be extended from 5' to over 8' high. It is easy to make and costs about $6 per pole (year 2000 prices!) It is suitable for bluebird houses since they are light and will not overload such a long pole. The birdhouse can be lowered for inspection, then raised up to its higher position for safety.
Parts needed to make two telescoping metal poles: 2 pc 1" EMT Conduit 10' (about $8) 1 pc 3/4" EMT Conduit 10' (about $2) 4 pc 1/4 x 1&1/2" bolt with matching wing-nuts (2) and hex nuts (2,) (about $1) 2 pc 1/4 x 2&1/2" carriage bolt with washer and nut (for attaching houses to pole) 2 pc #8, ¾" sheet metal screws 2 pc 8" 16 gauge galvanized wire (for attaching houses to pole)
Tools needed: Hacksaw, vice, drill or drill press with drill bits, pole driver, level, metal file, pliers, screwdriver, wrench set. [Note: often a store like the Home Depot will cut the conduit to any size for free. In this case you do not need the hacksaw and vice.]
To make it: === Cut the two 1" EMT to 7', 8' or 9' (your height plus 18" to 24".) Use the vice to hold the conduit as you use the hacksaw. Save the short pieces for some other project.
=== Drill a 1/8" hole 4' 6" from ONE end of each of the 1" EMT pieces. The hole should go clear through the metal pole (you will drill through two surfaces, along the diameter of the pole.) If you need to, you can use a center punch to mark the starting point for the drill bit not to slide. Usually a small hole like this is easy to start without a punch mark. Start to drill slowly, once the drill bites you can drill with more force.
=== Drill these same holes larger to 9/32" (drilling a hole in metal requires first a small hole, then the second time use a drill up to the size wanted.) It is a good idea to file the "burr" which results from drilling in metal. Now you have two pieces of 1" EMT, each with a hole through it about 4' 6" from one end.
=== Put a 1&1/2" bolt and nut in each of the two holes just drilled. These will act as a stop to prevent the inner rod from falling through inside the outer rod and disappearing on you…
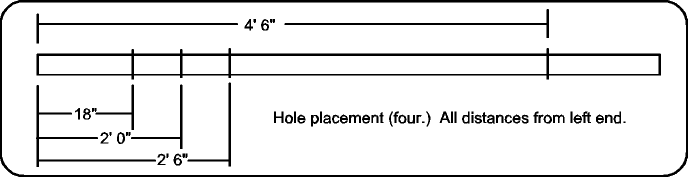
=== Measuring from the same end, make a second hole in each of these two pieces, this time 18" from the end. Again start with the 1/8" bit, and then the 9/32" bit. File the metal burr. This hole represents the "highest" position of the bottom of the inner tube when it is used to lift the nestbox. You can make more holes for positioning the nestbox at other heights. [Recommended: make two more holes at 24" and 30" in each piece, measuring from the same end as before. This gives three heights for the pole.] The diagram shows the relative positions of these four holes in one of the two pieces, the second piece is identical.
=== Drive these two pieces of 1" EMT into the ground using the pole driver. MAKE SURE THE right end shown above IS at the bottom. Driving a pole into the ground takes about 5 minutes (less if my 19 year old son is helping). As you drive it the first few inches, check using the level that it is going down straight (vertical.) Put the level along the conduit and check at two points around the pole, 90º apart. Drive these EMT conduit down into the ground till the top of the conduit is at the level you want the nestbox to be when you monitor it. Checking for vertical is not essential if you have a good eye for it. I often look against the corner of a house to tell vertical quite accurately.
=== Cut the 3/4" EMT conduit in the middle (result: two 5' pieces).
=== Insert the thin pole (with the house attached) into the EMT which is in the ground. It should be at eye level where you can inspect it when monitoring. Raise the box up and put a bolt and wing-nut in one of the holes in the 1" conduit which is in the ground. This bolt is the "stop" for the inner conduit at the height you like when the box is raised to its higher position.
=== Make sure the inner conduit is resting on the 1/4" bolt. If this is not the height you want, there are two other heights to choose from. Now orient the box in the direction you want. In general it is OK to let the entrance hole face any direction except West. Your specific location may dictate the direction to orient the box. Drill a hole 7/64" through both the outer and the inner conduits (but don't drill clear across to the other side of the pole.) Now screw the sheet metal screw (3/4" #8) to hold both conduits together. The first time the screw is driven into the holes, it will be hard since it has to cut the thread as you drive it in. In the future it will be easy to take it out and drive it back in. the purpose of this screw is to prevent the box from facing the wrong direction and to firmly hold the two parts of the pole together.
Operation: === To lower the box, remove the 3/4" #8 screw, then remove the bolt holding the inner pole up. Make sure to hold the box so it will not fall down suddenly or too quickly, and guide it down to the lowest possible level for inspection. When done, raise it up and place the bolt back under the inner pole. Replace the wing-nut and tighten it a bit. Rotate the box and when the two holes match, insert the 3/4" screw back and tighten it.
That is all! If you have any questions or need more detail, please send me e-mail.
Fawzi Emad, Laytonsville, MD <femad"AT"comcast.net> |
|
Please feel free to send me, Fawzi Emad, any corrections, observations, comments or questions. Thank you! (The tail feather on the left is from Koko, our Blue-Front Amazon Parrot.) |